This post is part 1 in my series on creating financial statements in Power BI! I’m starting with creating an Income Statement. The source data and Power BI file used in the example below can be found here.
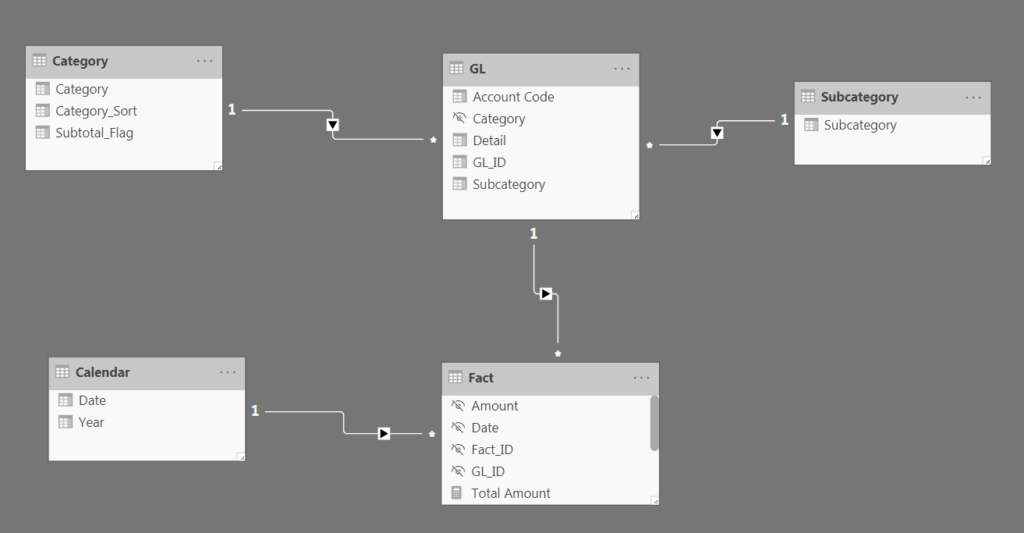
I loaded the source data into the Power BI report. It consisted of three tables:
- Fact table: contains dollar amount of transactions
- GL table: contains categorization of transactions
- Calendar table: contains date information for the data model

I created the first draft of the income statement using the raw source data. This included the category and subcategory information from the GL table. This was a good start, but I needed to create a “Net Income” line item that displays the difference between revenue and expenses.

To achieve this, I went to the Power Query Editor! I referenced the GL query to create a new Category query. I manipulated the data to return a list of distinct categories. In this case, just the Revenue and Expense line items.
I added a step to the query that used the Table.InsertRows() function. I defined three additional line items that I wanted to appear in the category table.
= Table.InsertRows(#"Added Custom", 0, {
[Category = "Net Income", Subtotal_Flag = 1],
[Category = "Retained Income - Beg of Period", Subtotal_Flag = 1],
[Category = "Retained Income - End of Period", Subtotal_Flag = 1]
})
Now the query had the three additional rows and an additional column: Subtotal_Flag (this will come into play later in this series!)

The last step was to create a sort column for the query. This would serve two purposes:
- I could ensure the categories are displayed in the correct order in the visual
- I could use this column as the basis for some logic in the DAX measures required for the report.

I also spun off another query that referenced the GL table for the subcategories. I didn’t need to add any additional line items. There were just three subcategories that mapped to the Revenue and Expense categories.

I loaded the two new queries and added them to the data model in the report.

I had my new data model and I was ready to go. But.. nothing changed in the visual! What happened to net income?

Nothing was displaying because no records in the Fact table were related to these items in the Category table. That makes sense, as I had just added Net Income myself; it hadn’t come directly from the source data.
I needed to create a measure that could populate the income statement for the Net Income line item. Net income, as the name suggests, nets expenses from revenues. So I needed a measure that would net the two categories above.
This is where I used category sort column! I utilized =CALCULATE() to create a subtotals measure. It calculates the year to date amount from all of the transactions for the categories that had a lower sort number (and therefore appeared above in the visual) a particular category.

Things were starting to look good, but I needed this subtotal to appear in the same column as the YTD Amount that was already displayed in the visual. Once again, I could use the category sort column as the basis for some logic. This time, I used the =SWITCH() function.
If the category was net income, I wanted to display the subtotal measure that I created above. Otherwise, I wanted the standard YTD amount to display.

I dropped the new measure into the matrix visual. Close, but not quite what I wanted just yet. The net income calculates correctly, but the measure returns all of the subcategories underneath the net income line item.

To avoid this, I had to adjust the measure. I can build logic off the fact that there are no records in the subcategory table that are associated with the Net Income line item in the category table. I added an additional clause to test for the number of rows in the subcategory table.

Now the data is displaying correctly! Net income is calculating properly and there are no longer the unnecessary subcategories.

That was part one of creating an Income Statement in Power BI. I added an extra line item in the Power Query Editor and created two DAX measures for the report: one to calculate subtotals and a second to return YTD totals and subtotals in the same column.

That was a great read! We have a planning tool, ValQ for Power BI from Visual BI Solutions. We would love to hear your insights about our product!
Sharing you a video link on how to Model an Income Statement with valQ – https://valq.com/videos/#modelling_an_income_statement
That was a great read! We have a planning tool, ValQ for Power BI from Visual BI Solutions. We would love to hear your insights about our product!
Sharing you a video link on how to Model an Income Statement with valQ – https://valq.com/videos/#modelling_an_income_statement
Hi,
Many thanks for this benefical read!
Unfortunately I couldn’t reach the source data and Power BI file.
Could you please renew the link or could it be possible for you to share the resource with me?
Thank you so much!
Thank you for bringing this to my attention! I have updated the link with the source files.
Excellent work, thank you very much. The source data and Power BI file used in the example source is no longer available. Kindly assist
Thank you for pointing this out! I have updated the link with the source files.
Thank you
Great information, thank you so much! Unfortunately the link for the source is no longer available. Could you please assist?
Hi Joseph,
Great blog post on building an Income Statement in Power BI.
I was unable to access the files from the link in your post.
Is there another way to access them?
Thanks,
Adam
Hey mate, link seems to have gone astray asgain.
Updated. Thanks for letting me know! Hopefully resolved for good now..